
Objective: In this unit, you will spend time getting familiar with how to operate the simulator to taxi around an uncontrolled airport, and conduct takeoffs and landings.
Completion Standards: You have completed this unit when you can consistently:
- Takeoff and maintain centerline alignment
- Fly the traffic pattern legs using headings, making turns at the correct altitude
- Roll out of the base to final turn with the runway in sight
Preparation: Flight in the traffic pattern using a simulator is difficult in simulators that have a visual system that provides less than 270 degrees of outside visuals. Also, the flight controls do not behave exactly like the airplane, so you will need to learn to adapt to these differences:
- The yoke is a spring-centering yoke; you will need to position the airplane’s nose attitude using the yoke, and then use trim to slowly move the yoke to the neutral position while maintaining the desired nose attitude.
- You will not be able to see the flap setting indicator. The flap switch actuates the flaps 10 degrees per switch movement. You will need keep track of the flap position by looking at the left window view to see the amount of flap extension.
- With the reduced visual system, you will need to fly the traffic pattern by relying more on the altimeter and heading indicator.
- Research French Valley Airport (F70) and create a diagram that identifies the headings and altitudes for each leg of the traffic pattern. Plan to fly left traffic for Runway 18. On the diagram:
- Determine the runway heading, crosswind, downwind and base headings
- Plan to turn crosswind at 700 above field elevation
- Plan to turn downwind at 1000 above field elevation (traffic pattern altitude)
- Use the left hand window to determine your abeam landing position. Start your descent by reducing power.
- Turn base when you have descended 300 feet (700 AGL)
- Turn final when you have descended 600 feet (400 AGL).
Radio Phraseology
Aircraft operated at a non-towered airport use a common radio frequency, referred to as a CTAF (Common Traffic Advisory Frequency), to announce their position and intentions while operating on the surface or in the air in the vicinity of the airport. Pilots of inbound traffic should monitor and communicate as appropriate on the designated CTAF from 10 miles to landing. Pilots of departing aircraft should monitor and communicate on the appropriate frequency from start-up, during taxi, and until 10 miles from the airport unless airspace or local procedures require otherwise.
Each of these radio broadcasts consists of the same sequence of four bits of information, a pattern that makes it easy to say and easy for other pilots to interpret. You may have heard this broadcast referred to as the ‘four W’s’.
Who you are talking to – Who you are – Where you are – What are your intentions
For example, if you were a Cessna airplane with the registration number 123AB, about to depart French Valley Airport’s runway 36 and remain in the traffic pattern, you would announce:
French Valley traffic, Cessna One Two Three Alpha Bravo departing runway three six, staying in the pattern, French Valley.
Note that the airport’s name is repeated at the end of the transmission. Multiple airports may share the same CTAF radio frequency, making it important for pilots to communicate the name of airport they are operating at so that monitoring pilots can determine if the transmission is relevant to their operations. The airport name is communicated a second time at the end of the transmission in case a monitoring pilot’s didn’t hear the start of the transmission and missed the airport name.
While you are flying in the traffic pattern, you will announce your position on each leg of the traffic pattern.
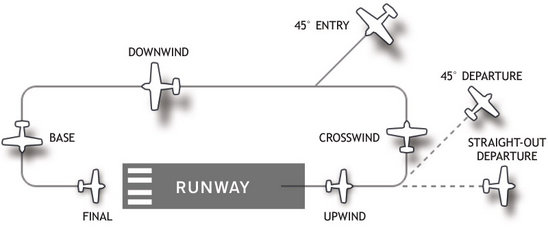
Crosswind Leg:
French Valley traffic, Cessna One Two Three Alpha Bravo, entering left crosswind runway three six, staying in the pattern, French Valley.
Downwind Leg:
French Valley traffic, Cessna One Two Three Alpha Bravo, entering left downwind runway three six, full stop, French Valley.
Base Leg:
French Valley traffic, Cessna One Two Three Alpha Bravo, entering left base runway three six, full stop, French Valley.
Final Leg:
French Valley traffic, Cessna One Two Three Alpha Bravo, entering left base runway three six, full stop, French Valley.
Note that on the crosswind leg, you are communicating that you intend to fly the traffic pattern, while on the remaining legs you are communicating that you intend to make a full stop landing. The difference is due to the face that the crosswind leg is a typical departure route away from the airport, and its important to communicate your intentions while on this leg. On the remaining legs of the traffic pattern, you are communicating what you plan to do after landing. A ‘full stop’ landing means that you plan to exit the runway after landing. Other options include ‘touch and go’, ‘stop and go’, and ‘low approach’.
Finally, when you exit the runway at the end of the traffic pattern practice session report leaving the runway.
French Valley traffic, Cessna One Two Three Alpha Bravo, clearing runway three six, taxiing to the ramp, French Valley.
Reference: AIM 4-1-9. Traffic Advisory Practices at Airports Without Operating Control Towers
Airspace/Airport Review:
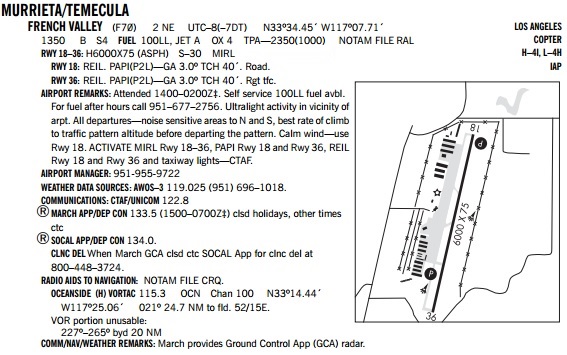
Examine French Valley airport on the Los Angeles Sectional chart and answer these question below.
Hover over the question to check your answer. If you were not correct, please references the resources below
Resources – Aeronautical Chart User Guide – Airspace Summary
|
|
Weather
Prior to operating an aircraft for the purpose of flight, or arriving inbound to an airport, you need to obtain weather information for the airport. Many non-towered airports operate an automated system that broadcasts weather information on a radio frequency. This system is typically an Automated Weather Observation Station (AWOS). You will practice obtaining the AWOS recording during this lesson. The sequence of information broadcast by the AWOS is consistent and is the same sequence as a METAR.
| Identifier | Date/Time | Wind | Visibility | Ceiling | Temperature/Dewpoint | Altimeter Setting |
| F70 | 1835Z | 180@10 | 10SM | SKC | 33/8 | 30.12 |
Aviation weather products use abbreviations to communicate a lot of information in a small format. You can study this guide to interpret METAR and AWOS report.
Setup
- Console: Ensure Panel Master switch is on, throttle is at idle and mixture is rich.
- Launch Microsoft Flight Simulator.
- Select ‘Cessna 172 – F70 – Northwest Ramp’ flight file.
- Print and review this airport diagram to determine the aircraft’s position on the runway and route to taxi to the runway.
Experience Checklist
- Review the traffic pattern diagram you made in the preparation section earlier. Keep this diagram on your kneeboard so that you can refer to it while flying the traffic pattern.
- Obtain the AWOS in the simulator; enter the F70 AWOS into the Comm 1 radio and switch it to the active frequency. Practice writing down the AWOS as fast as it is heard. Determine the runway to be used based upon the reported winds.
- Enter the F70 CTAF frequency into the Comm 1 Radio.
- Broadcast the taxi announcement on the CTAF.
- Taxi to runway that is best aligned into the wind. Its easy to get lost at an unfamiliar airport. Use the compass to verify you are heading in right direction, and taxiway signs to verify your location.
- Complete the runup and before takeoff checks.
- Perform a collision avoidance scan to ensure the runway is clear at all air and ground incursion points.
- Make departure announcement and enter runway
- Takeoff and fly the traffic pattern using the headings and altitudes you determined during preparation for this lesson.
- Make all announcements in the traffic pattern (crosswind, downwind, base, final, upwind)
- Continue to fly left traffic until you can consistently roll downwind at the desired runway width (runway is halfway up the left lift strut) and you can consistently roll final with the runway in front of the aircraft.
- If you are having trouble obtaining alignment with the runway when turning final, use the heading indicator to determine a heading to fly back to the airport. If you lose complete sight of the airport, reset the simulator and start again.
Reflection
Reflect on what was needed to fly a consistent pattern in the simulator. You will find that these same skills transfer to flying a consistent pattern in an airplane.
